
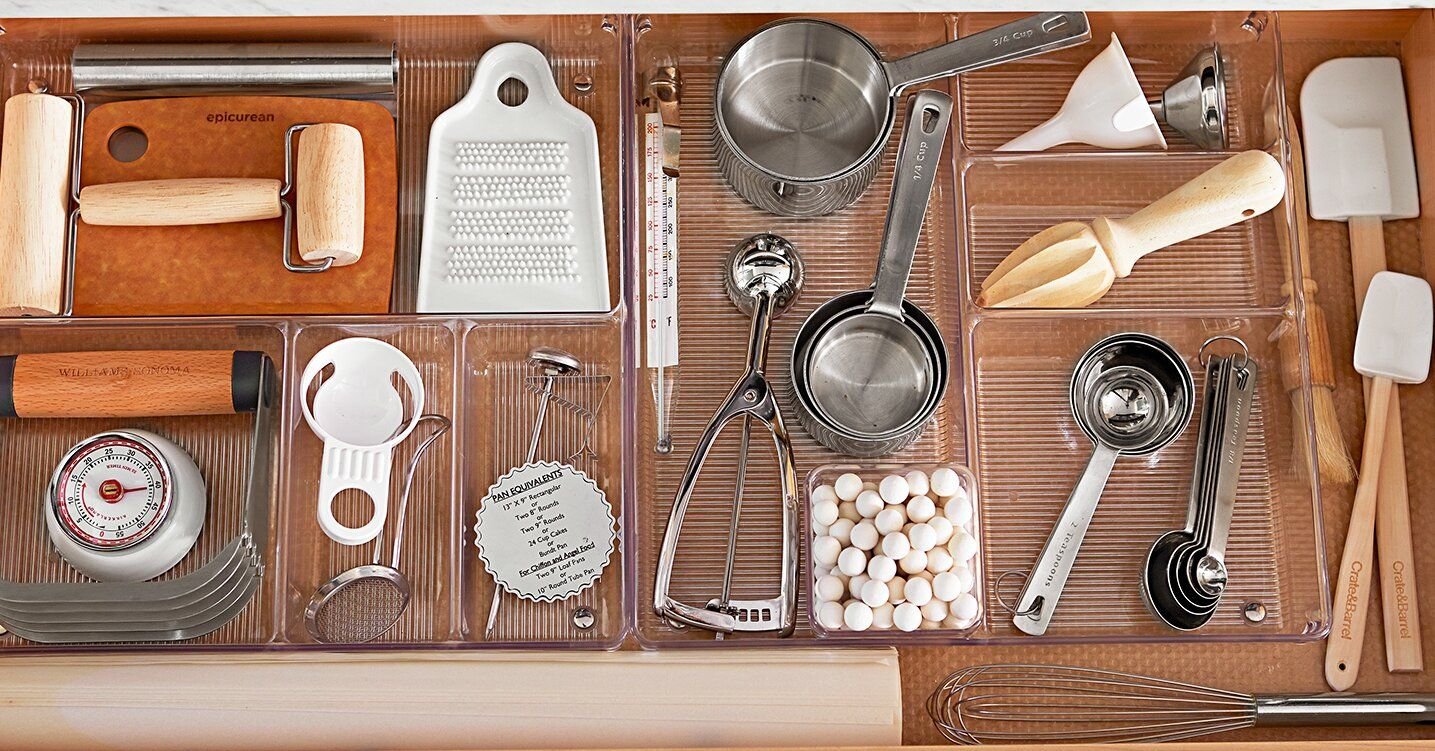
A well-organized kitchen makes cooking and meal preparation much easier. With the right storage choices, you can keep everything accessible and tidy while also creating the illusion that your kitchen is larger. Regardless of the size of your kitchen, some storage items might be very useful. Every home can benefit from the following list of necessary kitchen storage products. 1. Drawer Organizers Drawer organizers (paid link) are a must-have for keeping utensils, cooking tools, and small items tidy. Without them, drawers can quickly turn into messy spaces where it’s hard to find anything. You can make sections for various goods with drawer organizers because they come in adjustable variants that fit drawers of any size. To ensure that everything has its place, you can keep knives, forks, spoons, and other utensils apart. In addition to making, it simple to get what you need, this arrangement may free up additional drawer space for other necessities. Additionally, drawer organizers work well for keeping small kitchen tools like measuring spoons, bottle openers, and even spices organized. 2. Clear Storage Container Any well-organized kitchen must have clear containers (paid link). Rice, pasta, flour, and sugar can all be easily stored in them, and you can see what’s inside without having to open each one. Many clear containers are also stackable, which can save valuable cabinet and pantry space. Clear storage containers (paid link) come with airtight lids, which help keep food fresh longer and prevent pests. Label each container for the extra organization so you always know what’s in them and how much you have left. A pantry filled with clear containers also looks neat and visually appealing. 3. Lazy Susan’s A Lazy Susan, or rotating tray, is incredibly useful for organizing hard-to-reach areas. They’re perfect for corner cabinets, deep pantry shelves, or anywhere items tend to get lost at the back. With a Lazy Susan, you can easily spin the tray to access everything without knocking over other items. Lazy Susan’s (paid link) are especially helpful for storing spices, sauces, or small jars that you need to grab quickly. You can even use a Lazy Susan on your countertop for cooking oils, salt, and pepper, so everything you need is within reach. 4. Over-the-Door Organizers Over-the-door organizers (paid link) are ideal for kitchens that have little room. You can place them on the back of pantry doors, cabinet doors, or even on walls to add storage without taking up counter or shelf space. For keeping small utensils, cleaning supplies, snacks, or spices, many over-the-door organizers have hooks or pockets. These organizers make it easy to keep items you use frequently in one spot. They’re also a great option for renters or small kitchens where you might not have a lot of cabinet space. 5. Pull-Out Cabinet Shelves Pull-out cabinet shelves (paid link) are a game-changer for organizing deep cabinets. These shelves slide out, allowing you to easily see and access everything stored in the back. They’re particularly useful for pots, pans, and mixing bowls, which can be heavy and awkward to reach. With pull-out shelves, you can store items in layers, making the most of your cabinet’s depth. They allow you to easily access what you need without having to rearrange everything in the cabinet. Even dividers are included with certain pull-out shelves to prevent goods from moving around. 6. Stackable Bins Stackable bins are great for organizing your fridge, freezer, and pantry. These bins allow you to utilize vertical space, which is frequently underutilized in kitchen storage. Stackable bins (paid link) are ideal for storing fruits, veggies, snacks, and sauces in your refrigerator or pantry. In the freezer, stackable bins are useful for keeping frozen vegetables, meats, and prepped meals organized. Label each bin so you can quickly find what you’re looking for. Stackable bins come in various sizes, so you can choose the ones that fit best in your space. 7. Magnetic Knife Strip A magnetic knife strip is an effective method to keep knives organized without taking up valuable drawers or counter space. With this wall-mounting strip, you can keep knives close at hand and safely stored. It also gives your kitchen a more professional appearance and allows for additional tools in drawers. Magnetic knife strips are also useful for storing other metal tools like scissors or bottle openers. Just be sure to mount it securely and out of reach of children if needed.

Air Fryer: Between Ninja Crispi and Cuisinart.
Choosing an air fryer, especially between the (paid link) Ninja air fryer and (paid link) Cuisinart air fryer brands, can be a very challenging task for home chefs and professional cooks seeking a more convenient cooking appliance. These two models offer unique features and options that appeal to different cooking styles and preferences. The performance features and cooking results may differ, but the two are designed to provide crispy, fried, healthier food without much oil. This review will present a forthright comparison between these two brands, highlighting each appliance’s strengths and weaknesses. Examining factors like cooking performance, ease of use and design, and cleaning makes it easier to determine which air fryer best suits your needs. Like many people, home chefs and professional cooks alike are turning to air fryers for healthy meal preparation, and understanding the differences between these two popular brands is crucial. This understanding can assist you in making a cognizant decision that will complement your cooking experience based on the key factors below. Air Fryer Technology & Working Principle Air fryers utilize innovative technology to cook food quickly and healthily. They employ hot air circulation to achieve a crispy texture without the need for excessive oil. Similar to conventional cooking, they operate with a mechanism involving a heating element paired with a powerful fan. This generates a high-speed circulation of air around the food that promotes even cooking. Key Features of Modern Air Fryers Modern air fryers come with various features that enhance usability and cooking results. Common features include: All these modern technology features contribute to making air fryers appealing, making them versatile kitchen appliances for various cooking styles. Benefits of Using an Air Fryer There are numerous advantages to using an air fryer that resonates with health-conscious consumers. These benefits make air fryers a popular choice in modern culinary practices these days, aligning with healthier eating trends. Comparing Brand: Ninja Air fryer VS. Cuisinart Air fryer Looking through the Ninja and Cuisinart brands of air fryers reveals distinct strengths between the two brands. Each brand has a unique history and product lineup that influences consumer choice. This brand offers tender crisp technology that combines pressure cooking and air frying in one unit, making it versatile for both slow cooking and quick finishes. Control Options: Models like (paid link) Ninja Foodi 6-in-1 and (paid link) Ninja Foodi 9-in-1 series often feature multiple cooking functions, providing users with advanced cooking options and premium technology. Capacity: Their products often combine air frying with baking, broiling, roasting& grilling, defrosting, and more. They offer larger space, offering 4 to 8 quarts of crisper basket and cooking pot, allowing larger meals. This versatility appeals to users seeking efficiency. Result: These products offer excellent browning and crispy looks because of high heat circulation. Cuisinart’s air fryer offers a different approach; this brand generally focuses on air frying, baking, broiling, and emphasizing classic cooking essentials. Capacity: (paid link) Cuisinart TOA-60 or (paid link) Cuisinart TOA-70 models feature a larger toaster oven style with a lot of versatility for air frying. Cuisinart brand air fryers might not have as many features as Ninja brand, but they maintain strong qualities and high performance. The (paid link) Cuisinart Air Fryer Toaster oven exemplifies this by combining traditional toaster oven functions with air frying capabilities. Control Options: The brand offers a mechanical dial for temperature and timer settings, while some models like (paid link) Cuisinart TOA-95 offer a digital display, and come with an open light and dual cook preset. Results: The brand provides a great crispy performance result with an even distribution of heat. Ninja Air fryer: Cuisinart Air Fryer: Ninja fryer: Cuisinart Air Fryer:
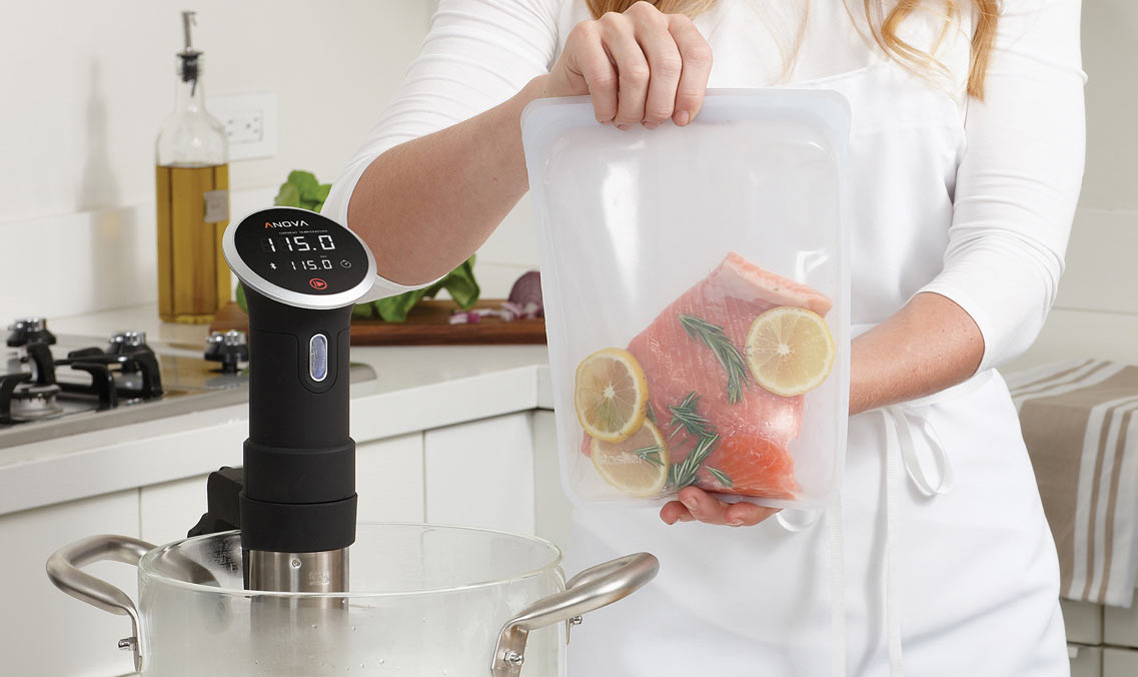
How a Sous-Vide Machine Can Elevate Your Cooking Experience
Cooking is both an art and a science; one kitchen tool that beautifully combines these elements is the sous-vide machine. While the term “sous-vide” might sound fancy, the concept is quite simple and accessible to anyone. Professional chefs have embraced this method of cooking for years, but now, thanks to modern technology, it’s something you can easily use at home. In this blog, we’ll explain how a sous-vide machine works and how it can take your cooking to the next level. What is Sous-Vide Cooking? Sous-vide is a French term that means “under vacuum.” It involves cooking food in a vacuum-sealed bag submerged in a water bath. The water is kept at a very precise temperature, usually controlled by a sous-vide machine. This gentle, even cooking method ensures that food is cooked perfectly from edge to edge without overcooking. Now that we’ve covered the basics, let’s dive into how using a sous-vide machine can elevate your cooking. Perfectly Cooked Meals Every Time One of the main advantages of sous-vide cooking is that it allows you to cook food to the exact doneness you want. Whether you’re cooking steak, chicken, or fish, you can set the sous-vide machine to the precise temperature for the perfect results. For example, if you like your steak medium-rare, you can set the water bath to exactly 130°F (54°C), and it will cook evenly throughout, with no risk of overcooking or burning. No more guessing or worrying if your meat is undercooked or too dry—sous-vide takes the guesswork out of the process. Locks in Flavor and Moisture Traditional cooking methods, such as grilling or pan-frying, can cause food to lose moisture and flavor due to high heat. With sous-vide, the food is sealed in a vacuum bag, which locks in the natural juices and flavors. As a result, you get a more tender, juicy, and flavorful dish. This is especially helpful when cooking proteins like chicken breast or pork chops, which tend to dry out easily. The gentle sous-vide method keeps the meat moist and tender, even if it’s cooked for an extended period. Consistent Results Consistency is key when it comes to cooking, and sous-vide ensures that your dishes turn out the same way every time. Since the water temperature is carefully controlled, there’s no risk of the food cooking unevenly. Whether you’re cooking for two people or a large group, sous-vide allows you to achieve the same perfect results without worrying about overcooking. Less Stress and Effort One of the most appealing aspects of sous-vide cooking is how hands-off it is. Once you’ve sealed your ingredients in a vacuum bag and placed them in the water bath, you can walk away and let the machine do the work. There’s no need to constantly check on your food, flip it, or adjust the heat. This makes sous-vide ideal for busy home cooks who want to prepare a delicious meal without standing over the stove. You can start the cooking process in the morning, go about your day, and come back to perfectly cooked food that’s ready to be finished. Easy to Sear and Finish While sous-vide ensures your food is cooked perfectly on the inside, some people miss the crispy or caramelized texture that comes from grilling or searing. Fortunately, you can easily finish your sous-vide dishes with a quick sear in a hot pan or on a grill. For example, after preparing a piece of beef through the sous vide technique, a short period of grilling, let’s say one minute on each side will produce a crunchy outside layer while the inside is still soft and wet. The same process makes use of the same technique when using chicken, fish, or even vegetables. Expands Your Culinary Skills Sous vide cooking is such an amazing invention that a home chef can get excited about so many new ideas for preparing meals. Here you can try various combinations of tastes and consistencies and use some components, which are rather challenging when it comes to conventional preparing and boiling. Sous-vide also makes it possible to prepare hard-to-cook products such as eggs or seafood since it is not easy to get them right. For example, with sous-vide, you can make perfectly poached eggs every time, with a runny yolk and firm whites. Or you can prepare flaky, tender fish that won’t fall apart. The precise control offered by the sous-vide machine gives you the freedom to try out new dishes and cooking techniques. Better for Meal Preparation If you happen to have a routine of cooking your meals in batches throughout the week, sous vide will be the best bet to go for. You can prepare and cook several portions of the food at once and take the leftover foods to the fridge or to the freezer to be warmed when you are ready for the food. Sous vide does not change the texture and moisture of food; reheating is thus simple – and your food will still taste as good as it did when it was cooked. Conclusion Sous vide is not just a new fad; it is a technique that has been tried and tested and which can boost the quality of home-cooked meals. Whether it’s meat or vegetables, the sous-vide guarantees the perfect taste while giving a chef confidence, reliability, and imagination. For any person whether a professional or a newlywed who has an objective entering the kitchen to cook their next meal adding sous-vide to the cooking process will make the resulting food appealing and the time spent in the kitchen worthwhile. Therefore, if you ever needed an excuse to level up your culinary skills, consider getting your hands on a sous-vide machine!

Maximizing Your Kitchen Space – Tips & Solutions
A cluttered kitchen can make cooking and meal prep stressful, especially if you’re working in a small space. The good news is that with a few smart strategies, you can make the most out of your kitchen, no matter its size. In this blog, we’ll explore some easy and practical tips to help you maximize your kitchen space, creating a more efficient and enjoyable cooking environment. De-clutter and Organize Start by De-cluttering The first step to maximizing your kitchen space is to de-clutter. Go through your cabinets, drawers, and countertops to remove any items you no longer use or need. Old appliances, duplicate utensils, and damage cookware’s should be donated or discarded. A cleaner, more organized kitchen will give you more room to work. Group Similar Items Together Once you’ve de-cluttered, group similar items together. Keep all your baking supplies in one area, cooking tools in another, and dishes in a separate space. This will make it easier to find what you need quickly and free up space in your kitchen. Consider using drawer dividers or baskets to keep everything organized. Use Vertical Space Install Wall Shelves One of the best ways to create more storage in your kitchen is to use your vertical space. Installing wall shelves, pegboard, magnetic strip. This allows you to store items you don’t use every day, such as cookbooks, decorative jars, or extra plates. Floating shelves are great for adding storage without taking up any floor or counter space. Hang Pots and Pans If you have limited cabinet space, consider hanging your pots and pans. You can use hooks or a hanging rack to keep them within easy reach. Not only does this frees up counter and cabinet space, but it also gives your kitchen a more professional and organized look. Add Hooks for Utensils Hooks can be a simple yet effective way to maximize space in your kitchen. Install hooks under cabinets or on the wall to hang utensils, measuring cups, and even mugs. This will clear up drawer space while keeping everything accessible when you’re cooking. Invest in Smart Storage Solutions Use Drawer Organizers Drawer organizers are a great way to maximize the space inside your drawers. They allow you to separate utensils, knives, and small gadgets, so everything has its place. This prevents items from getting jumbled together, saving you time and reducing clutter. Add Pull-Out Shelves Pull-out shelves are a fantastic solution for maximizing the space in your lower cabinets. These shelves allow you to easily access items stored at the back of the cabinet without having to bend down or shuffle things around. They’re perfect for storing pots, pans, or pantry items. Get Stackable Containers In small kitchens, every inch counts. Stackable containers can help you make the most of your cabinets and fridge. Use them to store leftovers, dry ingredients, or snacks. Not only do they save space, but they also keep your food fresh and organized. Optimize Your Counter Space Use a Cutting Board Over the Sink If you’re low on counter space, consider getting a cutting board that fits over your sink. This gives you extra workspace without taking up any more room. You can chop, slice, and dice your ingredients and then easily slide any waste into the sink. Install a Wall-Mounted Dish Rack Instead of using a bulky dish rack that takes up valuable counter space, opt for a wall-mounted version. These racks allow your dishes to air-dry while freeing up counter space for meal prep. Some designs even come with a drip tray to keep your counters clean. Keep Small Appliances Off the Counter Small appliances like toasters, blenders, and coffee makers can quickly eat up your counter space. To maximize your kitchen’s workspace, store these appliances in cabinets or on shelves when you’re not using them. If you use them frequently, consider a designated appliance garage or a pull-out shelf. Make the Most of Cabinet Space Use Cabinet Doors Don’t overlook the space on the inside of your cabinet doors. You can install hooks or small racks to store cutting boards, pot lids, or cleaning supplies. This is a great way to keep essential items organized without taking up shelf space. Add Lazy Susan’s A Lazy Susan is a rotating tray that can help you make better use of your corner cabinets or deep pantry shelves. They allow you to easily access items stored in the back, like spices, sauces, or canned goods, without having to dig through everything. Utilize the Top of Cabinets The top of your cabinets is often an underused space. If your cabinets don’t go all the way to the ceiling, use that area for storing less frequently used items, like large pots, trays, or seasonal dishes. You can place them in decorative baskets to keep things looking tidy. Select Multi-Purpose Furniture and Equipment Get an Island with Storage If you have space for a kitchen island, look for one that has some incorporated storage. An island with storage beneath it is a great way to get a few more pots, pans, or even a microwave. Some islands also have wine storage or built-in benches which makes it not only versatile but also useful in the kitchen. Use Multi-Function Appliances It can be justified to search for appliances that have other functions to reduce the amount of items used. For instance, there are appliances such as a toaster oven that can toast, bake, and even broil food, thanks to its elements which take less space than other big ovens. Different blades that come with the blender also make it possible for you to have a food processor without having to acquire another appliance. Conclusion To optimize the kitchen area, it is not necessary to apply the most complex and expensive solutions. A little improvisation and planning bring into being a better-suited and effective plan for the kitchen. All these methods, from cleaning to choosing the right idea for kitchen organization, will help you get more space in
Tips for Making Perfect Smoothies
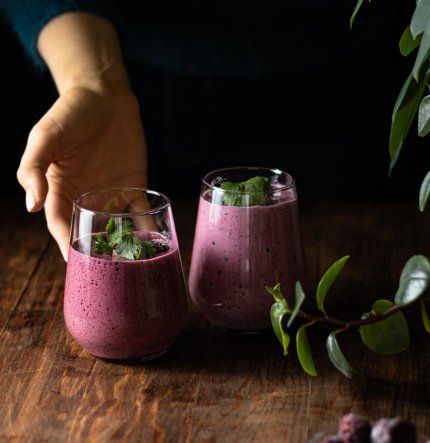
Smoothies are a great and healthy way to start the day, replenish your energy after exercise, or enjoy as a delightful treat. They’re easy to prepare, adaptable, and rich in minerals and vitamins. These tips will help you make the ideal smoothie every time, regardless of your level of experience blending smoothies. 1. Choose the Right Base The basis of your smoothie is critical. It sets the tone for the entire beverage. Here are a few popular possibilities: Milk: Adds smoothness and mild taste. You can use any type of milk you like, including cow’s milk, almond milk, and soy milk.Yogurt: Greek yogurt offers a rich, thick mouthfeel while also providing a protein boost.Juice: Fruit juice imparts sweetness and a fruity flavor. Orange juice, apple juice, and pineapple juice are excellent options.Water or Coconut Water: For a lighter option, use water or coconut water. They hydrate without adding more calories. 2. Add Fresh or Frozen Fruit Fruit is the highlight of any smoothie. It adds natural sweetness and a range of nutrients. Here are some excellent fruits to include: Berries: Strawberries, blueberries, raspberries, and blackberries are all excellent choices. They’re low in calories and high in antioxidants.Bananas: Bananas provide smoothness and natural sweetness. They are also a good source of potassium.Mango: Mangoes add a tropical flavor and are rich in vitamins A and C.Pineapple: Pineapple gives a sweet and tangy kick and is good for digestion.Using frozen fruit can make your smoothie colder and thicker, eliminating the need for ice. 3. Include Vegetables Adding vegetables to your smoothie is a simple way to increase its nutritional content without compromising flavor. Here are several vegetables that combine well. Spinach: Spinach is mild in flavor and integrates well. It’s full of vitamins and minerals.Kale: Kale has a strong flavor yet is quite healthy. Start with a small amount and adjust to your liking.Carrots: Carrots have a mild sweetness and are high in beta-carotene.Cucumber: Cucumber offers a refreshing flavor and promotes hydration. 4. Boost with Protein Protein helps you stay full and satisfied. Here are some ways to put protein into your smoothie: Protein Powder: Whey, soy, and pea protein powders are all terrific choices.Greek Yogurt: It provides creaminess and protein.Nut Butter: Almond, peanut, and cashew butter have a delicious flavor and include healthy fats.Silken Tofu: Tofu mixes easily and is a good plant-based protein source. 5. Healthy Fats Healthy fats are necessary for a balanced smoothie. They help your body absorb vitamins and keep you feeling fuller for longer. Here are some healthy fat alternatives: Avocado: Provides smoothness and healthy fats without a strong flavor.Chia Seeds: These little seeds are high in omega-3 fatty acids and provide a lovely texture.Flax Seeds: Flax seeds are an excellent source of omega-3s. Make sure to grind them first.Coconut Oil: Coconut oil has a lovely coconut flavor and contains healthy fats. 6. Naturally Sweetener / Flavor. Try these natural sweeteners if your smoothie needs a bit more sweetness: Honey: Provides a deep sweetness and is high in antioxidants.Maple Syrup: Naturally sweet and has a distinct flavor.Dates: Puree in a blender until the consistency resembles caramel.Stevia: Stevia is a sugar substitute that has no calories and doesn’t raise blood sugar levels. 7. Don’t Forget the Liquid Use the right amount of liquid to get the smoothness you want in your smoothie. Start with a small amount and increase it gradually as needed. Here are some alternatives: Milk or plant-based milk: Enhances creaminess.Juice: Increases sweetness and taste.Water or coconut water: This helps the smoothie stay light and hydrated.Green tea: It contains antioxidants and has a mild flavor. 8. Blend in Stages To achieve a smooth texture, combine your smoothie in stages. Stage 1: Liquids and Greens: Begin by mixing the liquid with the leafy greens (such as spinach or kale) until smooth.Stage 2: Fruits and veggies: Blend the fruits and other veggies till smooth.Stage 3: Protein and Fat: Blend with protein powder, nut butter, or other healthy fats.Stage 4: Ice or Frozen Ingredients: If using ice or frozen fruit, add these last and blend until you get the appropriate consistency. 9. Taste and Adjust Taste your smoothie before you pour it. To brighten the taste, add extra sweetness, liquid, or a squeeze of lemon or lime. 10. Serve and Enjoy Pour your smoothie into a glass or to-go cup and enjoy immediately. If you wish to keep it for later, refrigerate it in an airtight container for up to 24 hours. Shake it well before drinking. Conclusion Finding the appropriate balance of taste and quantity is essential for crafting the perfect smoothie. To find your optimal combination, experiment with different amounts of fruits, vegetables, proteins, and healthy fats. These recommendations can help you become an excellent smoothie maker rapidly. To delicious and nutritious smoothies!
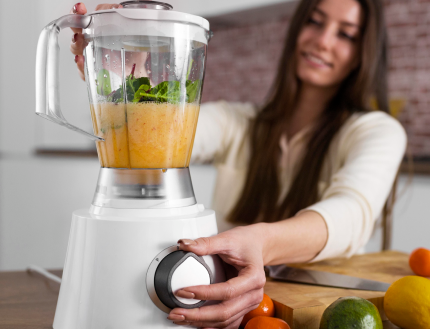
How to Choose the Perfect Blender for Your Kitchen Needs
You may increase the efficiency of meal preparation and cooking by choosing the right blender for your kitchen. With so many possibilities available, picking the one that best matches your needs may be tough. Here’s an easy guide to choosing the best blender for your kitchen. Understand Your Needs Before you start shopping, consider what you’ll use the blender for. Different blenders are suited for different tasks, so it’s important to know what you need. If you love making smoothies, you’ll need a blender that can handle fruits, vegetables, and ice. For making soups, sauces, and purees, a blender with a powerful motor is essential. If you make frozen drinks or crushed ice, look for a blender designed for ice-crushing. Understanding your individual needs will help you narrow down your options. Consider the Types of Blenders Blenders come in a multitude of variations, each with special features and advantages. The most popular kind of blender is the multipurpose countertop one with large jars, ideal for making sauces, smoothies, and soups. Personal blenders are smaller and perfect for making single servings of smoothies or shakes; they often include travel cups that can be used on the go. Immersion blenders, also known as hand blenders, are useful for blending soups directly in the pot and are small and easy to store. Strong, long-lasting, and capable of handling challenging materials like ice and nuts are the characteristics of high-powered blenders. Usually more costly, they are incredibly potent. Check the Power The power of a blender is measured in watts. Higher wattage is typically correlated with increased power, making it advantageous to combine more challenging materials. A blender with 500 to 700 watts is good for basic blending tasks like smoothies and shakes. For crushing ice and making soups and sauces, a blender with 700 to 1000 watts is ideal. For heavy-duty tasks and high-performance blending, look for a blender with 1000 watts and above. Ensuring you have the right power for your needs will make your blending tasks much easier. Look at the Blade Quality Blending properly requires the use of blender blades. Most blenders come with durable, sharp stainless steel blades. Seek for blenders that have multiple levels of blades to aid in the better blending of food. Stainless steel blades are used for their durability and ability to tolerate complicated components. A decent blade design and material will allow your blender to run more efficiently and last longer. Consider the Jar Material and Size The material and size of the blender’s jar are important because here is where the blending occurs. Glass jars are durable and less likely to retain odors or stains, and they are also microwave-safe. Plastic jars are lighter and less likely to break but can stain or retain odors over time; look for BPA-free plastic for safety. Choose a jar size based on your needs. While smaller jars are ideal for single servings, larger jars work well for larger batches. Choosing the appropriate container will assist the mixing process. Check the Controls and Settings Blenders have several settings and controls. A blender with numerous speeds allows you to have more control over the blending process, so look for one with at least a few. The pulse feature allows you to mix in quick intervals, which is useful for cutting or combining objects equally. Some blenders have pre-programmed settings for tasks like smoothies, ice crushing, and soups, which can be convenient for specific tasks. Having the right controls and settings can make using your blender much easier. Think About Ease of Cleaning Cleaning a blender can be a hassle if it’s not designed well. Check to see if the jar and blades are dishwasher-safe for simple cleanup. Blenders with replaceable blades and jars are typically easier to clean. Some high-end blenders offer a self-cleaning mode where you can simply add water and a touch of soap, and the blender cleans itself. Ensuring your blender is easy to clean will save you a lot of time and effort. Set Your Budget Blenders come in a wide range of prices. Setting a budget helps narrow down your choices. Basic blenders suitable for occasional use can be found for under $50. Better-performing and more feature-rich mid-range blenders usually run between $50 and $100. High-end blenders can cost $100 or more and often include powerful motors, several settings, and complicated functionality. Knowing your budget can help you choose a blender that fits your demands without going over. Read Reviews and Ratings Before making a final decision, check online reviews and ratings from other users. This can give you an idea of how well the blender performs and its reliability. Look for reviews that mention the blender’s performance, durability, and ease of use. User feedback, recommendations and suggestions from friends, family or kitchen professionals can provide valuable insights that can help you make a more informed choice. Try Before You Buy If possible, visit a store and test the blender. Examine how comfortable it is to hold, how straightforward it is to use, and how quiet it is when in operation. Testing in person might help you determine whether the blender matches your needs. A hands-on test can frequently disclose aspects that are not obvious from online descriptions and reviews. Conclusion Choosing the perfect blender for your kitchen doesn’t have to be complicated. By understanding your needs, considering the types of blenders, and checking features like power, blade quality, and ease of cleaning, you can find a blender that fits your lifestyle. Whether you’re making smoothies, soups, or ice cream, the right blender can make all the difference. Take your time, set a budget, and choose wisely to enjoy a blender that meets all your kitchen needs.
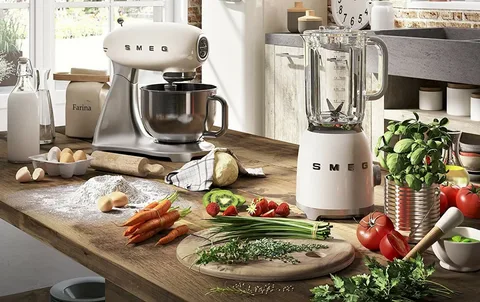
A Guide to Kitchen Appliances & Tools
The kitchen is the heart of the home, where great meals are produced and memories are created. To get the most out of your cooking experience, you must have the proper appliances and tools. This guide will walk you through some of the most important kitchen appliances and supplies that can facilitate and enhance your culinary experience. Essential Kitchen Appliances Refrigerator In any kitchen, a refrigerator is an absolute necessity. It keeps your drinks cold and your meals fresh. When choosing a refrigerator, consider the amount of storage you need as well as the size of your kitchen. Modern refrigerators are equipped with common features like water dispensers, ice makers, and smart technologies that can help you keep track of your items. Microwave Oven Microwave ovens are very helpful for reheating leftovers, defrosting frozen food, and cooking simple meals. They are available in a variety of sizes and capabilities, including convection cooking, grilling, and pre-programmed settings for different sorts of food. Oven and Stove A good oven and stove combination is crucial for baking, roasting, broiling, and cooking a wide variety of dishes. There are three types of stoves available: gas, electric, and induction. Each has advantages. Electric stoves are easier to clean, while gas stoves allow for more exact temperature control. Induction stoves use less energy and heat up rapidly. Dishwasher A dishwasher can save you a great deal of time and effort. Modern dishwashers are efficient, use less water than hand cleaning, and have multiple settings to accommodate different types of dishes and levels of dirtiness. Some even have features such as delayed start and sanitizing cycles. Must-Have Small Appliances Blender A blender is a multipurpose kitchen appliance that can be used to grind coffee beans in addition to producing soups, sauces, and smoothies. Strong blenders are an excellent addition to any kitchen since they can combine difficult foods and smash ice. Toaster and Toaster Oven Toasters and toaster ovens are perfect for quick breakfasts and snacks. A toaster can make perfectly crisp toast, while a toaster oven can bake, broil, and reheat small amounts of food without needing to use the main oven. Coffee Maker A good coffee machine is essential for coffee connoisseurs. There are numerous options to suit your preferences, whether you prefer drip coffee, espresso, or French press. Certain coffee machines include integrated grinders and adjustable settings to ensure that you always get the perfect cup. Slow Cooker Slow cookers are perfect for prepping meals ahead of time. You can prepare your materials in the morning and arrive home for a hot, ready-to-eat meal in the evening. It’s perfect for soups, stews, and other dishes that need slow cooking. Essential Kitchen Tools. Knives Every kitchen needs a decent pair of knives. The chef’s knife, paring knife, and serrated knife are the three most important types of knives. For the majority of chopping, slicing, and cutting tasks, these are appropriate. To get the best results, buy high-quality knives and keep them sharp. Cutting Boards Cutting boards protect your countertops and provide a safe surface for chopping. To avoid cross-contamination, it’s a good idea to have at least two: one for fruits and vegetables and one for meats. Wooden and plastic cutting boards are the most common types. Measuring Cups and Spoons Accurate measurement is crucial for successful baking and cooking. Measuring spoons and cups are sold in sets and are composed of silicone, metal, and plastic among other materials. Make sure you have measuring glasses for liquid and dry ingredients for different recipes. Mixing Bowls Mixing bowls are necessary for mixing, marinating, and serving. They are made of plastic, glass, and stainless steel and are available in a variety of sizes. With a nested collection of varying sizes, you can conserve space and satisfy all of your demands. Utensils Cooking and serving require basic tools such as spatulas, wooden spoons, tongs, and whisks. Silicone utensils are heat-resistant and gentle on nonstick cookware, whereas wooden spoons are durable and versatile. Specialty Tools Food Processor A food processor can make food prep much easier. It can chop, slice, shred, and puree various ingredients. It’s especially useful for making dips, doughs, and finely chopping vegetables. Stand Mixer The best companion for a baker is a stand mixer. It effortlessly blends, kneads, and whips ingredients. The fact that many models include attachments for grinding meat, preparing pasta, and other uses makes it a useful appliance for any kitchen. Instant Pot A multi-cooker, the Instant Pot performs the duties of a rice cooker, slow cooker, pressure cooker, and more. It is ideal for busy households and can greatly reduce cooking times. Conclusion Having the correct kitchen appliances and tools can help you cook more effectively and efficiently. Begin with the basics and eventually add specialty products as your culinary abilities improve. With the correct equipment, you’ll be able to cook tasty dishes and enjoy your time in the kitchen even more.